How to Photograph Vintage Vinyl for Discogs: A Practical Guide
Ever tried to take a quick picture of a glossy 1980s LP sleeve, only to see your own silhouette and the ceiling fan perfectly reflected right in the middle of the cover? It is incredibly frustrating. You just want to list the record and move on, but you end up doing a weird, hunched-over dance just to block the overhead light.
Selling records online requires building trust with collectors. If you want to know how to photograph vintage vinyl for Discogs without pulling your hair out over glare and weird shadows, you are in the right place.
Good photos do more than just make your listing look pretty. They act as absolute proof of your grading. Let's walk through a simple, reliable process for getting great shots of your collection using nothing but your phone and some decent light.
Why Original Photos Command Higher Prices on Discogs Than Stock Images
Discogs is a massive database. When you list a record, the platform automatically attaches the primary database image to your listing by default. It is fast, but it does not help you stand out.
A stock image tells the buyer absolutely nothing about the specific copy sitting on your desk.
Grading is notoriously subjective. One seller's "Very Good Plus" (VG+) is another seller's "Good Plus" (G+). When a collector is dropping serious money on a first pressing, they want to see exactly what they are buying. If they have to choose between a $50 listing with a generic stock photo and a $55 listing with sharp, clear photos of the actual record and sleeve, they will pay the extra five dollars almost every time.
Uploading your own photos removes the guesswork. It shows you care about your inventory, and it immediately elevates you above the dozens of other sellers relying on the default grey box.
Understanding Discogs Image Guidelines for Sellers
Before you start snapping away, it helps to know what Discogs actually wants from your images.
Discogs prefers square images. Record sleeves are already perfectly square, so this is an easy rule to follow. When you upload photos to your specific marketplace listing, they will be cropped to a square ratio anyway. Just set your phone camera to the "Square" or "1:1" setting before you start shooting.
Keep your backgrounds clean and free of clutter. Discogs is primarily a catalog. While you want your listing to look nice, this is not the place for busy, artistic lifestyle shots with a cup of coffee and a scattered pile of autumn leaves.
Finally, avoid adding text overlays or watermarks. Buyers find them distracting, and they can obscure the very details a collector is trying to verify.
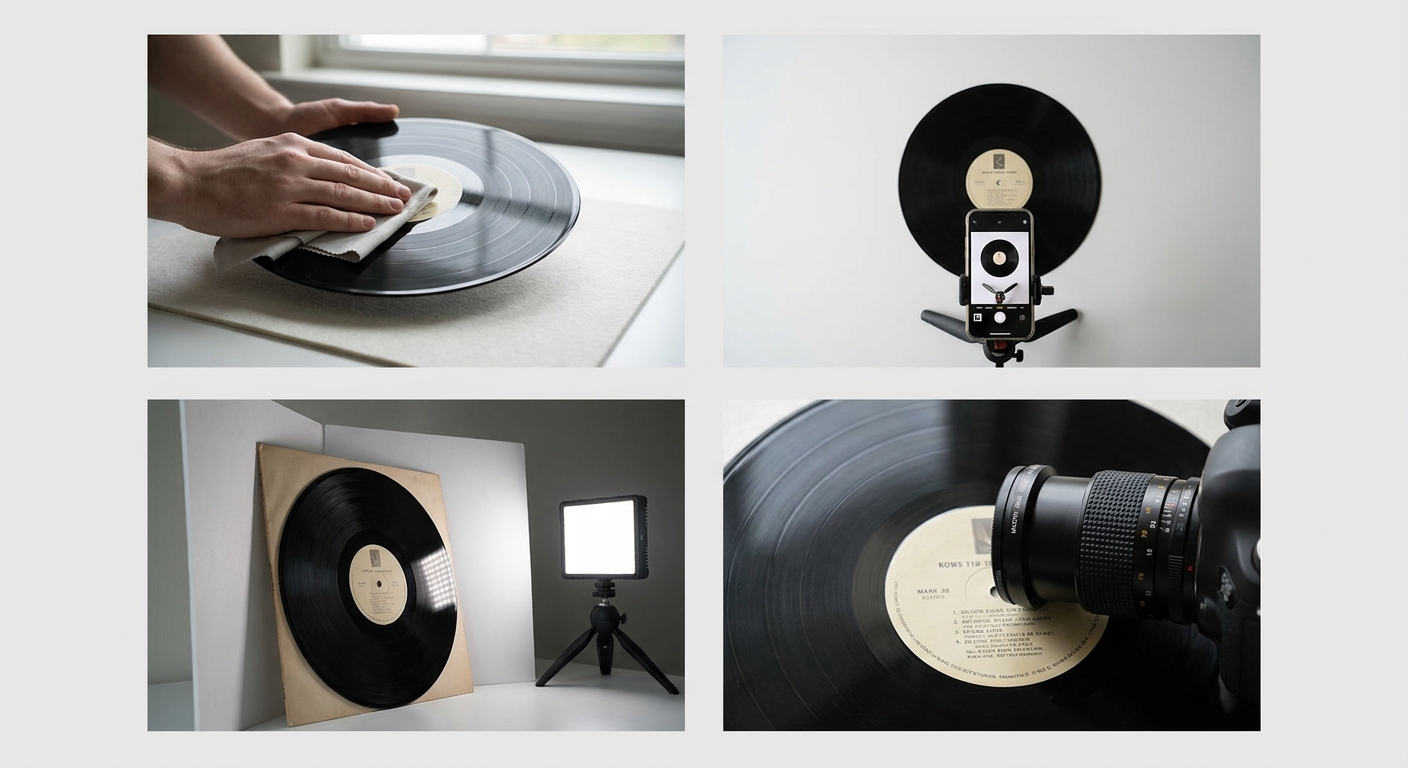
Essential Gear for Vinyl Photography (Smartphone Cameras Work Fine)
You do not need an expensive DSLR camera to shoot records. Modern smartphone cameras are more than capable of capturing the fine details of a vinyl groove or the texture of a cardboard sleeve.
What you do need is stability and light control.
Here is a quick list of the basics:
- Your smartphone: Any phone from the last five years will do.
- A cheap tripod: A basic phone tripod keeps your camera perfectly still. This is crucial for getting sharp photos of the matrix numbers in the dead wax.
- White foam board: Grab two pieces of cheap white foam core from a craft store. You will use these to bounce light onto the record.
- Black poster board: This is your secret weapon against reflections. More on this trick in a minute.
By keeping your phone on a tripod, you free up both of your hands to hold your bounce boards and physically angle the record.
Mastering Lighting: How to Eliminate Glare on Glossy Sleeves and Bare Wax
Glare is the biggest enemy of vinyl photography. Records and laminated sleeves are basically mirrors. If you point a direct light at them, that light is going to bounce straight back into your camera lens.
The secret is using soft, indirect light.
Never use your camera's flash. Turn it off completely. Instead, set up a table near a window. You do not want direct sunlight hitting the record—that will wash out the colors and create harsh shadows. You want the soft, ambient light coming through the glass.
If the light is still too harsh, hang a sheer white curtain or tape a piece of white parchment paper over the window. This diffuses the light, spreading it out evenly across the album cover.
If one side of the record looks too dark, prop up one of your white foam boards on the opposite side of the window. The light will hit the record, travel past it, hit the white board, and bounce back to fill in the shadows.
The Black Card Reflection Trick
What about your own reflection? If you are shooting a highly glossy sleeve straight-on, you will often see your phone floating in the middle of the cover.
Take your piece of black poster board and cut a small hole in the center—just big enough for your phone's camera lens to peek through. Hold the black board in front of your phone while you shoot. The glossy record sleeve will reflect the black board instead of you and the room behind you, resulting in a perfectly clean, deep, glare-free image.
The 85% Rule: Why Your Record Must Dominate the Frame to Show True Condition
I see a lot of sellers upload photos where the record is sitting on a chair all the way across the room. The album takes up maybe twenty percent of the image, and the rest is just empty space and living room furniture.
This completely defeats the purpose of uploading your own photos.
I built a tool called Shotsell around a core concept I call "The 85% Rule." The rule is simple: the product you are selling should take up 85 to 90 percent of the total image frame.
When a buyer clicks your photo on Discogs, they are looking for specific, tiny details. They want to see if the corners are dinged. They want to see if there is ring wear starting to form. If your record is a tiny square floating in a sea of background, those details are invisible.
Get close. Fill the frame. Make the record the undeniable star of the photo.
Shooting for the Grade: Capturing Spines, Ring Wear, Labels, and Dead Wax
Taking a single photo of the front cover is not enough. You need to document the exact anatomy of the record to back up your grading.
Here are the specific shots collectors look for:
The Front and Back Cover
Shoot these straight on, remembering the 85% rule. Make sure all four corners are visible in the frame. If there are clipped corners, promo stamps, or drill holes, do not hide them. Frame them clearly so the buyer knows exactly what they are getting.
The Spine and Seams
Split seams are a major grading factor. Take a close-up photo of the spine so the buyer can read the text. If there is a split forming on the top or bottom seam, take a macro shot of it. Honesty upfront prevents returns and bad feedback later.
Ring Wear and Surface Scuffs
Ring wear is the circular impression left on the cardboard sleeve from the vinyl inside. It usually shows up as faded ink on the front or back cover. Angle your lighting so the ring wear is visible.
For the actual vinyl, angle the record slightly toward the light source so the grooves catch the light. This will highlight any hairline scratches or scuffs. Again, you want these flaws to be visible in the photo so the buyer can see that your "VG" grade is accurate.
Labels and Dead Wax
The dead wax (the smooth area between the last track and the label) contains the matrix numbers. These etchings tell a collector exactly which pressing they are looking at.
Use your phone's macro mode if it has one. Get extremely close to the dead wax and angle it until the light catches the etched letters and numbers. A clear shot of a highly sought-after matrix number (like a Robert Ludwig "RL" cut) can double the selling price of an album.
Flat Lay vs. Upright: Choosing the Best Angle for Vinyl Records
You generally have two choices for staging your records: laying them flat on a table (flat lay) or standing them upright against a wall.
Flat lay is usually the easiest. It is very simple to get your camera perfectly parallel to the record, which keeps the square shape from looking distorted. Just lay the record on a clean, neutral surface like a wood table or a piece of grey poster board. Shoot straight down from above.
Upright shots can look a bit more professional, but they are harder to pull off without dropping the record. If you shoot upright, lean the record slightly against a plain wall.
If you use background removal apps for upright shots, be careful. This is exactly why AI product photos look fake half the time—apps try to generate fake 3D shadows that do not match the lighting on the record sleeve, making it look like it is floating in mid-air.
Editing Vinyl Photos: Balancing Contrast Without Misrepresenting Condition
Once you have your photos, you might need to do a little quick editing on your phone.
The goal of editing is not to make the record look better than it is. The goal is to make the photo look exactly like the record looks in real life.
You can bump up the exposure slightly if the photo came out too dark. You can also lift the shadows a bit to reveal details in darker album covers.
However, be very careful with the contrast slider. Cranking up the contrast will make the colors pop, but it will also artificially hide surface scuffs and minor ring wear. If a buyer receives a record and realizes you boosted the contrast to hide flaws, they will demand a refund. Keep your edits light and honest.
Streamlining Your Discogs Listing Workflow with AI Photography Tools
If you are listing a massive collection of 200 records, setting up the perfect background and lighting for every single shot can take days.
This is why a lot of sellers turn to AI background replacement tools. But if you have ever tried a Photoroom alternative or similar generic apps, you know they tend to mess up the scale. They take your square record, shrink it down to 30% of the frame, and surround it with fake marble countertops and generic houseplants.
I built Shotsell because I was tired of AI tools completely ignoring the product I was actually trying to sell. As an indie dev and a solo seller, I just wanted clean, professional backgrounds that didn't shrink my items.
With Shotsell, it's just $9.99 a month for 100 photos, and the entire app is built strictly around the 85% Rule. You snap a quick photo of your record on your desk, and the AI replaces the messy background with a clean, studio-quality surface—while keeping your record front and center, dominating the frame exactly like Discogs buyers want.
Final Thoughts on Shooting Your Collection
Great photography doesn't have to be complicated. Turn off your flash, use soft window light, and grab a piece of black poster board to kill those annoying reflections.
Most importantly, remember the 85% Rule. Fill the frame with the record. Let the condition speak for itself, and you'll find your inventory moving faster and for higher prices.
If you're tired of fighting with messy backgrounds and want a tool built specifically for solo sellers who care about scale, give Shotsell a try. There's no pressure, just a simple tool built to make your listing process a whole lot easier.